How to Repair Water-Damaged Ceilings After a Leak | Leak Proof Restoration
How to Repair Water-Damaged Ceilings After a Leak
A leaking ceiling can cause frustration and worry for any homeowner. Whether the source is a roof leak, burst pipe, or condensation, water damage can spread quickly and lead to structural issues, staining, and even mold growth if left untreated. This guide walks you through how to identify, repair, and prevent water damage to your ceiling safely and effectively.
Step 1: Identify the Source of the Leak
Before any repairs begin, the first and most important step is to find and stop the source of the water. If you repair a ceiling without addressing the leak, the damage will return.
Common sources of ceiling leaks include:
Roof leaks during or after rainfall
Leaking plumbing lines in an upper floor or attic
HVAC condensation lines or drain pans overflowing
Ice dams forming on the roof in cold weather
Turn off the water supply if you suspect a plumbing issue. If the leak is from rain, inspect your roof and attic for moisture spots, wet insulation, or dripping water.
Step 2: Contain the Water
Once the source is identified, prevent further water from spreading.
Place buckets or containers under any active drips.
Move furniture and electronics away from the wet area.
Use towels or a wet vacuum to soak up standing water.
If the ceiling is sagging from water accumulation, carefully puncture a small hole in the lowest point using a screwdriver or knife to release the trapped water. This prevents the ceiling from collapsing under the weight.
Step 3: Dry the Area Completely
Ceilings must be fully dry before repairs can begin. Moisture trapped behind paint or drywall can lead to mold or further damage.
Use fans and dehumidifiers to dry the space.
Open windows and doors to increase airflow.
Remove wet insulation if necessary, as it retains moisture and can promote mold growth.
It can take 24 to 72 hours for the area to dry completely, depending on the extent of the water exposure. For larger leaks, professional drying equipment may be needed.
Step 4: Assess the Damage
After drying, inspect the ceiling for the extent of damage. You will need to replace any materials that have lost structural integrity.
Signs your ceiling material needs replacing:
Warped or sagging drywall
Peeling or bubbling paint
Brown or yellow water stains
Soft or spongy texture when pressed
Small water stains or surface-level damage may be fixed with cleaning and repainting, but larger areas of drywall that are soft or crumbling will require replacement.
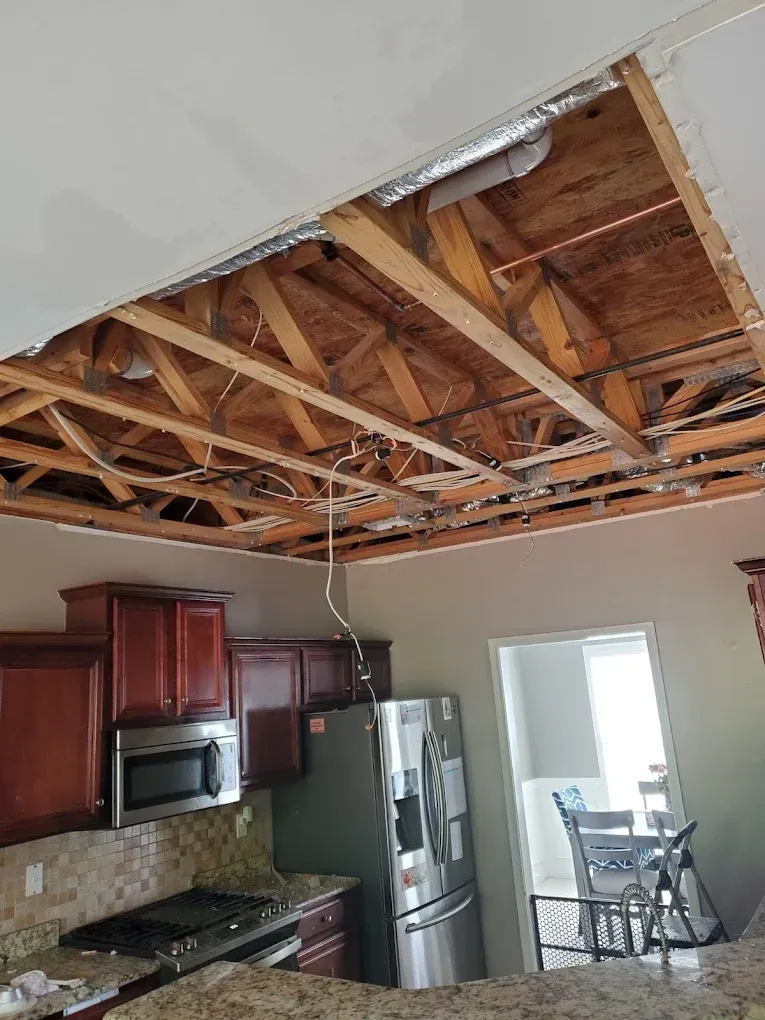
Step 5: Remove the Damaged Material
Carefully remove all damaged drywall or ceiling material using a utility knife or drywall saw. Cut about 12 inches beyond the visible water line to ensure all affected material is removed.
Wear safety gear such as gloves, goggles, and a respirator, especially if mold is present. Bag all debris and dispose of it outside the home.
Inspect the framing and insulation underneath. If wood framing is damp, dry it completely with fans before closing the ceiling. Replace any insulation that feels wet or shows signs of mold.
Step 6: Clean and Disinfect the Area
Before patching the ceiling, clean and sanitize all exposed surfaces to prevent future microbial growth.
Mix a cleaning solution of one part vinegar to one part water.
Wipe all surfaces thoroughly and allow them to dry.
If mold is visible, use a mold-specific cleaner or call a restoration professional for safe removal.
Once clean and dry, you can begin repairs.
Step 7: Patch and Replace the Drywall
Cut a new piece of drywall to fit the hole you removed. Use drywall screws to secure it to the ceiling joists or backing strips.
Apply joint tape over the seams.
Spread joint compound over the tape with a drywall knife.
Allow it to dry completely, then sand smooth.
Repeat with a second coat of compound if needed for a seamless finish.
Once the surface is smooth and even, the repaired section will be ready for priming and painting.
Step 8: Prime and Paint the Ceiling
Before painting, apply a stain-blocking primer to prevent any residual discoloration from bleeding through.
Use a primer specifically designed for water stains.
Apply one to two coats of primer and allow it to dry completely.
Paint the area with ceiling paint that matches the surrounding color.
For best results, repaint the entire ceiling if the repaired area is large to ensure consistent color and finish.
Step 9: Prevent Future Water Damage
After repairing your ceiling, take preventive steps to avoid another leak in the future.
Inspect your roof regularly, especially after storms.
Ensure gutters and downspouts are clear of debris.
Check plumbing lines and fixtures for leaks or corrosion.
Verify that attic ventilation and insulation are functioning properly.
A simple annual inspection can save you from expensive restoration work later.
Step 10: When to Call a Professional
While small leaks and minor ceiling stains can often be handled by a homeowner, larger or recurring leaks require professional attention. Call a restoration company if:
The ceiling has mold or a strong musty odor.
The water damage extends across multiple rooms.
You cannot identify the source of the leak.
There is electrical wiring near the affected area.
Leak Proof Restoration offers professional ceiling repair, water damage restoration, and mold remediation. Certified technicians use industrial-grade drying and cleaning equipment to ensure your ceiling is restored safely and effectively.
Final Thoughts
A water-damaged ceiling can seem intimidating, but with prompt action and proper repair steps, you can restore your home safely. The key is to address the moisture source, dry the area thoroughly, and replace any compromised materials.
If you notice stains, sagging, or peeling paint on your ceiling, act quickly. Leak Proof Restoration can help homeowners in Georgia restore their ceilings, repair water damage, and prevent future leaks before they become major problems.