How to Identify and Remove Mold After Water Damage | Leak Proof Restoration
How to Identify and Remove Mold After Water Damage
Water damage can create the perfect environment for mold growth, often within just 24 to 48 hours of exposure. Mold not only damages your property but can also pose health risks to everyone in your home. If you’ve recently experienced a flood, burst pipe, or roof leak, acting quickly is essential to prevent and remove mold growth effectively. This guide walks you through identifying, removing, and preventing mold after water damage, helping restore your home to a safe and clean condition.
Step 1: Understand How Mold Grows
Mold thrives in dark, moist environments with limited airflow. Common areas affected after water damage include basements, behind drywall, under flooring, and inside insulation. Mold spores are microscopic and travel through the air, meaning that once they take hold in one area, they can spread quickly throughout your home.
When water damage occurs, moisture seeps into building materials like wood and drywall. If not properly dried, this moisture becomes trapped, feeding mold colonies. The key to stopping mold growth is addressing both the moisture and the source of contamination immediately.
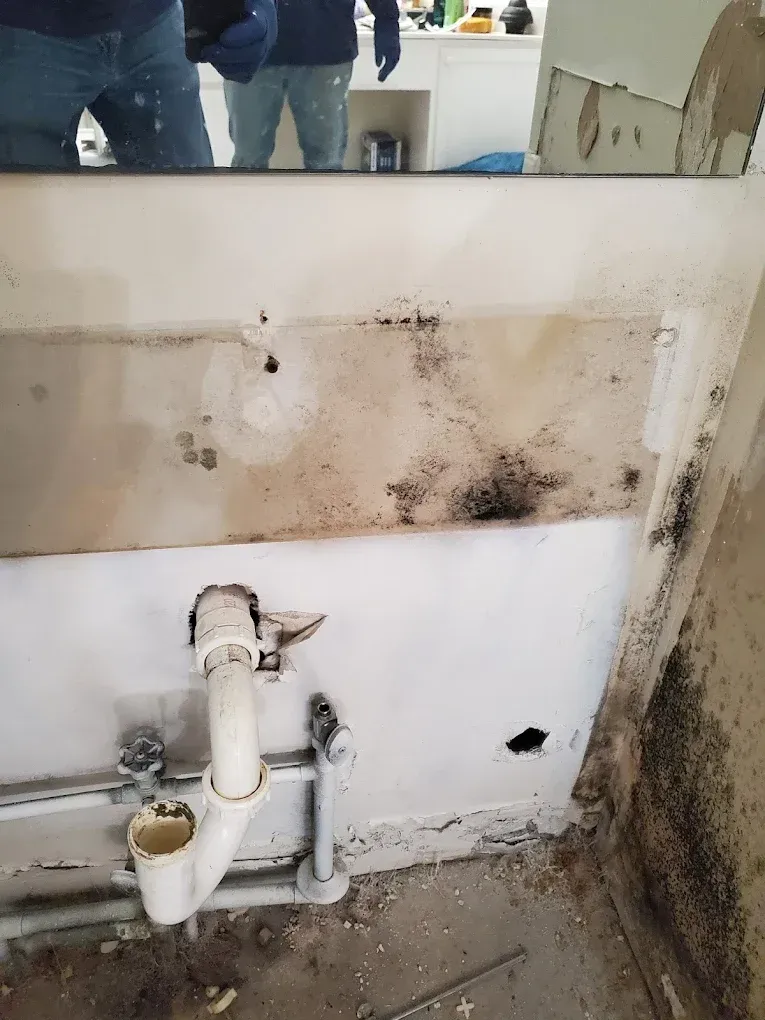
Step 2: Identify Signs of Mold Growth
Detecting mold early can save you from extensive restoration costs later. Mold often appears as discolored patches on surfaces and can range in color from green and black to white or gray. In some cases, it may be hidden inside walls or ceilings, detectable only through smell or humidity changes.
Common signs include:
A musty or earthy odor
Visible dark or fuzzy spots on walls or ceilings
Allergic reactions such as sneezing or itchy eyes when indoors
Peeling paint or bubbling drywall
Warped flooring or soft spots in walls
If you suspect hidden mold, consider using a moisture meter or hiring a professional to perform an infrared inspection to detect areas with high humidity behind walls or flooring.
Step 3: Stop the Source of Moisture
Before cleaning or removing mold, you must fix the water problem that caused it. Whether it’s a leaking roof, burst pipe, or poor ventilation, eliminating the moisture source ensures the mold won’t return.
Shut off any water supply if a pipe has burst.
Dry the affected area using fans and dehumidifiers.
Open windows to increase airflow and reduce humidity.
Check for roof or plumbing leaks and repair them promptly.
If your HVAC system was affected by water damage, it’s crucial to inspect and clean the ducts. Mold spores can easily travel through ventilation systems and spread throughout the home.
Step 4: Contain the Affected Area
To prevent mold spores from spreading to unaffected areas, isolate the contaminated space. Seal doors and vents using plastic sheeting and tape. Avoid running your air conditioner or heating system during cleanup since this can distribute spores through your home.
For small patches (less than 10 square feet), you can typically handle removal yourself with proper precautions. However, if the area exceeds that size or the mold has infiltrated insulation or structural components, contact a restoration specialist to handle removal safely.
Step 5: Wear Proper Protective Gear
Mold cleanup can release spores into the air, so wearing personal protective equipment is essential. This includes:
N95 or higher-grade respirator mask
Safety goggles
Rubber gloves
Long-sleeved clothing that can be washed immediately afterward
Avoid direct contact with mold, especially if you have allergies, asthma, or a weakened immune system. In such cases, it’s safer to rely on professionals for the cleanup.
Step 6: Remove Mold from Hard Surfaces
Non-porous materials like metal, tile, and glass can usually be cleaned thoroughly. Mix a solution of one cup of bleach per gallon of water and scrub the moldy surface with a stiff-bristle brush. After cleaning, rinse with clean water and dry the area completely.
For natural alternatives, a mixture of white vinegar and baking soda can also kill mold effectively. Spray vinegar directly onto the mold, let it sit for an hour, then scrub and rinse.
Avoid mixing bleach and ammonia or any other cleaning chemicals, as this can create toxic fumes.
Step 7: Handle Porous Materials Carefully
Mold can penetrate deep into porous materials such as drywall, insulation, and carpet padding. In most cases, these items must be removed and replaced rather than cleaned.
Cut out sections of drywall at least 12 inches beyond the visible mold growth.
Discard water-damaged insulation and replace it with new, dry material.
For carpets, remove both the carpet and the underlying padding if mold is visible or smells musty.
Once removed, double-bag the contaminated materials in heavy-duty plastic bags and dispose of them according to local regulations.
Step 8: Dry and Dehumidify Thoroughly
After removing contaminated materials, it’s essential to dry the area completely to prevent regrowth. Use dehumidifiers and high-powered fans for at least 48 to 72 hours. Aim to keep humidity levels below 50 percent.
If your home experiences frequent humidity issues, installing a permanent dehumidifier system can help maintain optimal moisture levels and prevent mold problems in the future.
Step 9: Clean and Disinfect Surrounding Areas
Even if mold is removed, residual spores can still exist nearby. Wipe down surrounding walls, floors, and furniture with an antimicrobial cleaner or a vinegar solution. Vacuum all surfaces using a HEPA-filter vacuum to capture airborne spores.
Wash any clothing, linens, or curtains that were exposed to mold spores. Use hot water and detergent, and dry items completely before returning them to the cleaned area.
Step 10: Restore and Repaint
Once the area is dry and free of contamination, you can begin restoration. Replace drywall, flooring, and insulation as needed. Before painting walls, apply a mold-resistant primer or sealant to prevent future growth. Choose paints labeled as mildew-resistant for added protection.
If mold damage affected structural components such as wood framing, ensure that these materials are treated with a mold-inhibiting solution before reconstruction.
Step 11: Prevent Future Mold Growth
Preventing mold from returning requires consistent moisture control and maintenance. Follow these steps to keep your home safe long-term:
Maintain proper ventilation in bathrooms, kitchens, and basements.
Use exhaust fans or open windows when cooking or showering.
Check your roof and plumbing regularly for leaks.
Keep gutters clean to prevent water pooling near your foundation.
Use a dehumidifier in high-humidity areas.
Regularly inspect hidden areas like attics and crawl spaces for early signs of moisture.
Step 12: Call a Professional Restoration Company
If mold contamination covers a large area, has spread into HVAC systems, or returns after cleaning, it’s time to call a professional. Restoration experts use specialized equipment such as HEPA air scrubbers, moisture meters, and negative air machines to safely remove mold and restore air quality.
Leak Proof Restoration provides comprehensive mold removal services, including inspection, containment, cleaning, and reconstruction. Their trained technicians ensure your property is fully restored and your air quality safe for living.
Conclusion
Dealing with mold after water damage can be challenging, but swift action makes all the difference. By identifying mold early, addressing moisture sources, and cleaning thoroughly, you can prevent further damage and protect your health. If the problem seems extensive or returns after treatment, professional restoration is the safest and most effective solution. Taking the right steps today ensures your home remains safe, healthy, and mold-free for years to come.