How to Clean and Restore Your Home After Smoke Damage | Leak Proof Restoration
How to Stop and Repair Water Damage from a Leaking Ceiling
Few things cause panic faster than seeing water dripping from your ceiling. Whether it’s a steady drip or a sudden burst, a leaking ceiling can lead to serious structural and electrical damage if not handled quickly. It’s one of those problems that starts small but can turn into a full-scale restoration project and fast.
At Leak Proof Restoration, we’ve handled hundreds of ceiling leak emergencies across Georgia, and we’ve learned that fast action and the right approach can mean the difference between a simple patch and an expensive ceiling replacement.
This article walks homeowners through how to identify, stop, and repair ceiling water damage safely, effectively, and with long-term prevention in mind.
Step 1: Identify the Source of the Leak
The first and most important step is figuring out where the water is coming from. Ceiling leaks often originate from one of these three sources:
Roof Leaks: Common after heavy rain or storm damage. Often caused by missing shingles, cracked flashing, or clogged gutters.
Plumbing Leaks: From pipes or fittings above the ceiling, especially near bathrooms, laundry rooms, or water heaters.
HVAC or Condensation Leaks: Air conditioning units or ductwork can collect moisture, especially during Georgia’s humid summers.
How to Locate the Leak:
Look for brown or yellow stains spreading across the ceiling.
If the ceiling is actively dripping, the wettest spot usually indicates the source directly above.
Use a moisture meter to confirm where the leak is most concentrated.
Check attics or crawl spaces for wet insulation or puddles.
If you can’t find the exact cause or if the leak is ongoing, turn off your home’s main water supply and call Leak Proof Restoration immediately. Our technicians use infrared imaging and leak detection tools to pinpoint the source without unnecessary demolition.
Step 2: Stop the Water Flow
Once the source is identified, you need to stop the water before damage spreads.
Roof leaks: Place a tarp over the affected section as a temporary measure.
Plumbing leaks: Shut off the water supply line to that area.
Condensation leaks: Turn off the HVAC system and check the drain line for clogs.
If water is actively pooling above your ceiling, you’ll need to drain it safely to prevent collapse.
How to Relieve Ceiling Pressure:
Place a bucket or container under the bulge.
Use a screwdriver or nail to poke a small hole in the sagging area to release the water gradually.
Allow the water to fully drain while monitoring for additional leaks.
It might sound risky, but puncturing a bulging ceiling actually prevents a much bigger collapse, saving you from major drywall and floor damage later.
Step 3: Remove Wet Materials and Contain the Damage
After stopping the leak, it’s time to contain and remove the damage.
Move furniture and electronics out of the affected area.
Roll back any carpet that’s damp underneath.
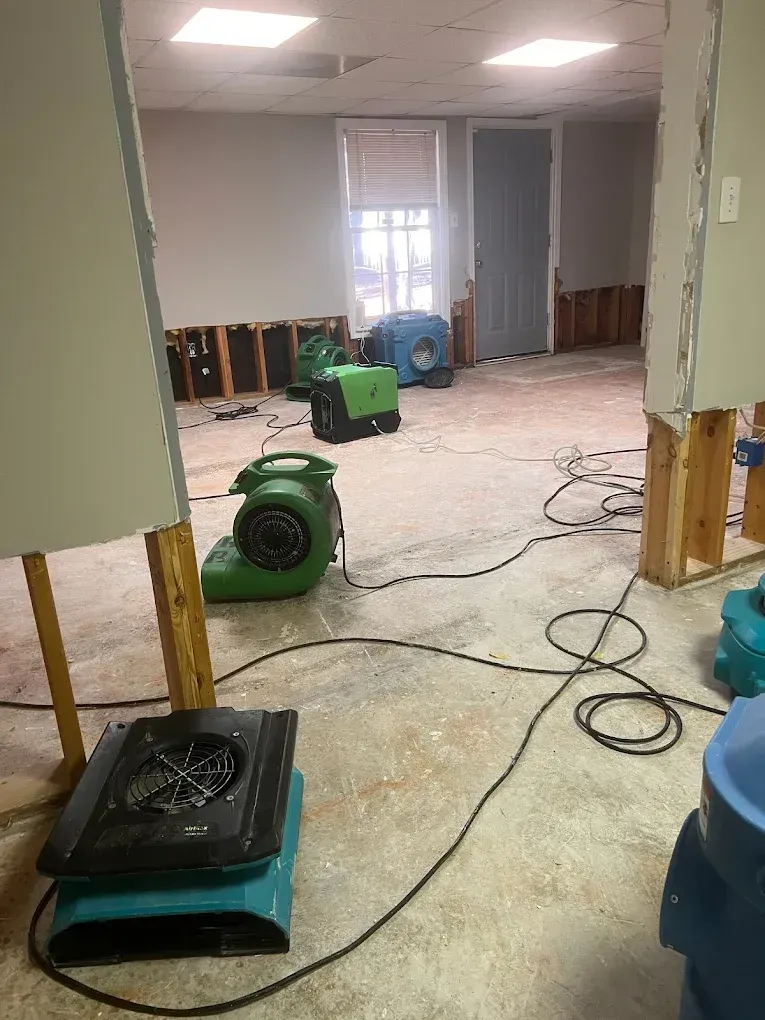
Set up fans and dehumidifiers to dry the space.
Remove any wet insulation, as it will never dry properly and can grow mold quickly.
Water can travel surprisingly far through drywall, joists, and subflooring. That’s why Leak Proof Restoration uses thermal imaging to map moisture spread, ensuring no hidden pockets are left behind.
Step 4: Dry the Ceiling and Walls
This is where most DIY cleanups fall short. Even if a ceiling looks dry on the surface, trapped moisture inside drywall and wood framing can lead to mold, rot, and warping weeks later.
How to Properly Dry the Area:
Dehumidify: Use an industrial-grade dehumidifier or rent one from a local equipment store.
Circulate Air: Use multiple fans aimed at different angles to maximize airflow.
Remove Trim: Pull off crown molding or trim pieces to allow air to reach behind walls.
Monitor Progress: Use a moisture meter daily until readings fall below 15%.
Leak Proof Restoration typically performs three to five days of structural drying, followed by moisture verification testing before any rebuilding begins.
Step 5: Clean and Disinfect Affected Areas
Ceiling leaks often contain more than just water; they can carry contaminants from roofing materials, HVAC dust, or even sewage if plumbing-related.
Use a non-bleach antimicrobial cleaner to sanitize all affected surfaces. Avoid harsh chemicals that can damage drywall or paint finishes.
If mold spots begin forming, it’s crucial to act immediately. Mold can appear within 24 to 48 hours of water exposure. Leak Proof Restoration provides certified mold remediation for ceilings and attic spaces, safely removing spores without cross-contaminating other rooms.
Step 6: Repair and Repaint the Ceiling
Once fully dry and sanitized, you can begin the cosmetic repair process.
For Small Leaks:
Cut out the damaged drywall section at least six inches beyond the water stain.
Replace with new drywall and joint compound.
Sand smooth once dry, then apply stain-blocking primer.
Paint over with ceiling paint to match the surrounding area.
For Large Leaks:
If the ceiling has sagged or multiple panels are affected, you may need a full ceiling replacement. Leak Proof Restoration can handle both the removal and rebuild, ensuring structural integrity before repainting.
Pro Tip: Always use mold-resistant drywall or green board in areas prone to leaks, like bathrooms, laundry rooms, and basements.
Step 7: Check for Electrical Damage
If water leaked near light fixtures, outlets, or ceiling fans, do not attempt to use them until a licensed electrician inspects the wiring.
Water and electricity don’t mix, and post-leak shorts are a major fire hazard. Leak Proof Restoration partners with certified electricians to inspect and replace any compromised fixtures or wiring safely.
Step 8: Prevent Future Ceiling Leaks
Prevention is the best restoration. Once you’ve repaired the damage, it’s time to take steps that keep it from happening again.
For Roof Leaks:
Inspect your roof twice a year, especially after storms.
Clear gutters and downspouts to prevent water backup.
Seal around chimneys, skylights, and vents annually.
For Plumbing Leaks:
Insulate pipes to prevent condensation or freezing.
Check supply lines to toilets, sinks, and washing machines.
Install leak detection sensors that alert you to hidden drips.
For HVAC Leaks:
Flush your A/C condensate drain line every spring.
Change air filters regularly.
Have your system serviced to catch drain pan clogs early.
Leak Proof Restoration also offers preventive home inspection services, giving you peace of mind knowing small leaks are caught before they become major disasters.
Step 9: Address Hidden Damage
Even after visible water is cleaned up, hidden damage may remain. Common areas that need checking include:
Attic insulation: May be compacted and ineffective after getting wet.
Joists or rafters: Could have absorbed moisture, leading to warping.
Subfloors: Especially if water traveled down through multiple levels.
Leak Proof Restoration performs comprehensive post-leak inspections, including moisture mapping and air quality testing, to ensure your home is 100% safe and restored.
Step 10: File a Homeowners Insurance Claim
Ceiling leaks often qualify for insurance coverage, especially if caused by sudden or accidental damage like a burst pipe or storm.
Steps to File a Claim:
Take clear photos and videos of the ceiling and surrounding area.
Save receipts for any temporary repairs or restoration costs.
Notify your insurance company immediately.
Request a professional damage assessment from Leak Proof Restoration. We provide detailed reports your insurer will accept.
Our team works directly with adjusters to ensure you get fair compensation and avoid delays.
When to Call Leak Proof Restoration
Some leaks can be stopped and dried with quick DIY fixes, but others require professional attention.
You should contact Leak Proof Restoration if:
The ceiling has collapsed or sagged.
You notice mold growth or musty smells.
The source of the leak is unknown.
There’s visible electrical involvement.
The damage spreads across multiple rooms.
We provide 24/7 emergency response, complete water extraction, structural drying, mold prevention, and full ceiling restoration.
Final Thoughts
A leaking ceiling can feel overwhelming, but with the right steps, it doesn’t have to turn into a nightmare. The key is quick action, thorough drying, and professional follow-up.
By following this guide and contacting Leak Proof Restoration when needed, you’ll not only repair the damage but also protect your home from future leaks, mold growth, and structural issues.
Our experts specialize in water damage restoration, leak detection, and ceiling repair, serving homeowners across Georgia with reliable, long-lasting solutions.
Because when your ceiling starts dripping, you don’t need the stress, you need it Leak Proof.