How to Prevent and Treat Ceiling Water Damage Before It Spreads | Leak Proof Restoration
How to Prevent and Treat Ceiling Water Damage Before It Spreads
Ceiling water damage can sneak up on homeowners — often starting as a small, discolored patch and quickly turning into sagging drywall, mold growth, and costly repairs. Whether caused by a leaking roof, a burst pipe, or condensation buildup in the attic,ceiling water damage is one of the most common issues Leak Proof Restoration handles across Georgia homes.
In this comprehensive guide, we’ll show you how toidentify early warning signs,stop the leak at its source, andrepair ceiling damage safely and efficientlybefore it turns into a major restoration project.
What Causes Ceiling Water Damage?
Ceiling leaks can originate from several sources, depending on where the damage is located. Identifying the cause is the first and most important step in fixing it.
1. Roof Leaks
Damaged shingles, flashing, or gutters can allow rainwater to seep through your roof and into your attic or ceiling insulation. This is one of the most common causes of ceiling stains, especially after heavy storms.
2. Leaking Pipes
Plumbing lines that run between floors — especially those connected to bathrooms — can leak slowly, dripping into the ceiling cavity below.
3. HVAC Condensation
Poorly insulated ductwork or malfunctioning AC units can cause condensation to build up and drip onto ceiling panels.
4. Overflowing Tubs or Toilets
If someone upstairs lets a bathtub overflow or a toilet seal fails, the water will eventually find its way down — often showing up as a circular brown stain in the ceiling below.
5. Attic Moisture
Improper ventilation can trap humid air, leading to moisture accumulation and eventual ceiling staining or mold growth.
No matter the cause,the longer the water sits, the more damage it will cause— to your ceiling structure, paint, insulation, and even electrical systems.
How to Identify Ceiling Water Damage Early
The earlier you detect a leak, the easier it is to fix. Here are some signs that indicate ceiling water damage may be developing:
Yellow or brown stains:Circular marks are the most common sign of a leak.
Peeling paint or bubbling texture:Indicates trapped moisture under the surface.
Sagging drywall:Suggests significant water pooling above.
Mold or mildew smell:A musty odor can mean hidden water damage in the ceiling cavity.
Soft spots or discoloration:When the area feels damp or crumbly to the touch.
If you notice any of these warning signs, it’s time to act fast before the damage spreads.
Step-by-Step Guide: How to Stop and Repair Ceiling Water Damage
Step 1: Find and Stop the Source
The first step isn’t patching the ceiling — it’sstopping the water. Turn off the main water supply if you suspect a plumbing issue, or if it’s from rain, inspect the attic or roof for active dripping.
If you can’t locate the source,Leak Proof Restorationcan perform athermal imaging inspectionto identify exactly where the leak is originating — even if it’s behind walls or insulation.
Step 2: Drain Any Pooling Water
If the ceiling is bulging or sagging, water may be trapped behind it.
Here’s how to release it safely:
Place a large bucket or container under the bulge.
Use a screwdriver or small knife to puncture a small hole in the center of the bulge.
Let the water drain slowly and steadily into the container.
This might sound drastic, but allowing the ceiling to dry this way helpsprevent a total collapseand reduces structural strain.
Step 3: Dry the Area Completely
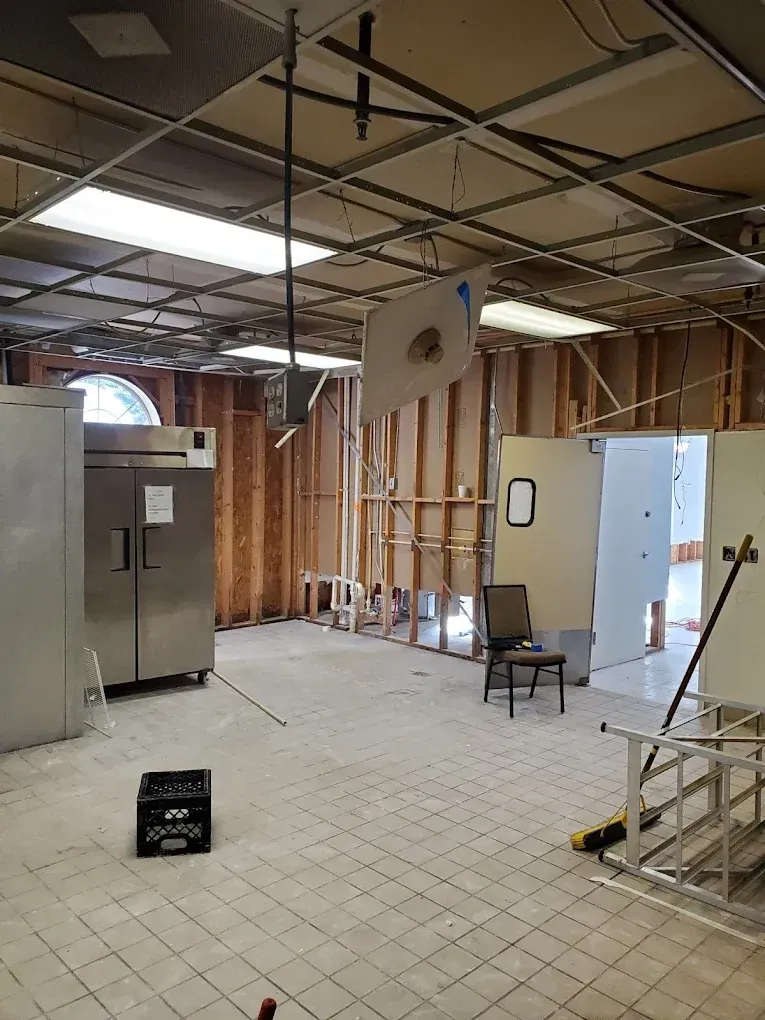
Drying is critical. Use fans, dehumidifiers, and open windows to circulate air and evaporate moisture. If the area is large or the insulation behind the ceiling is wet, professional-grade drying equipment is required to ensure moisture doesn’t get trapped inside.
Leak Proof Restoration usesindustrial air movers and dehumidifiersto speed up the drying process while monitoring humidity levels to prevent mold growth.
Step 4: Remove Damaged Material
Once everything is dry, cut away any soft, crumbling, or stained drywall sections. You’ll need to replace the affected material rather than paint over it — otherwise, the damage will eventually resurface.
Safety tip:Always wear gloves, goggles, and a respirator if there’s mold or fiberglass insulation present.
Step 5: Treat for Mold or Mildew
Even if you can’t see mold, spores can start growing within 24–48 hours after water exposure. Spray the area with a mold-inhibiting cleaner or diluted bleach solution before sealing and patching.
If there’s widespread black mold or a musty odor that doesn’t fade, it’s important tohire a certified mold remediation professional. Leak Proof Restoration isIICRC-certifiedfor mold removal and can ensure safe and thorough treatment of affected materials.
Step 6: Replace and Refinish the Ceiling
After the structure is dry and mold-free, you can replace the damaged sections of drywall. Use joint compound to fill gaps, sand the area smooth, and apply a stain-blocking primer before painting.
Make sure to color-match the ceiling — water stains can bleed through even new paint if not properly sealed.
Preventing Future Ceiling Leaks
Once your ceiling is repaired, it’s time to make sure it doesn’t happen again. Prevention is always cheaper than restoration.
1. Schedule Annual Roof Inspections
Roofing materials naturally degrade over time, especially in Georgia’s humid climate. Schedule a yearly roof check-up and clear gutters to prevent standing water.
2. Insulate Pipes and Ductwork
Cold pipes and HVAC ducts can cause condensation that drips onto ceilings. Adding insulation minimizes moisture buildup.
3. Maintain Bathroom Fixtures
Check the caulking and seals around tubs, showers, and toilets regularly. Replace them as soon as cracks or gaps appear.
4. Watch for Attic Humidity
Keep your attic well-ventilated. Add fans or vents if you notice damp insulation or musty smells.
5. Use a Leak Detection System
Smart leak detectors can alert you to moisture or water flow changes in your plumbing system, helping you act before damage occurs.
When to Call a Professional
You can handle small water stains on your own, but if the leak is continuous, the drywall is sagging, or you suspect mold, it’s time to bring in the pros.
Call Leak Proof Restoration if:
You notice recurring ceiling stains.
Water damage affects multiple rooms.
Mold or mildew has appeared.
The ceiling feels soft or spongy.
You can’t find the source of the leak.
Our certified team usesmoisture mapping,infrared scanning, andindustrial drying systemsto restore your home quickly, safely, and efficiently.
The Hidden Dangers of Ignoring Ceiling Water Damage
Many homeowners delay repairs, thinking a small stain isn’t urgent — but waiting can cost thousands more down the road. Here’s what can happen:
Structural Weakening:Waterlogged ceiling beams can rot or crack.
Electrical Hazards:Moisture near wiring can cause shorts or fires.
Mold Infestation:Within 48 hours, mold can spread into walls and HVAC ducts.
Increased Repair Costs:A $200 patch repair can easily turn into a $5,000 restoration.
Early action is always the smarter choice — especially when you have a trusted restoration team on your side.
Final Thoughts
Ceiling water damage may seem minor at first, but it can escalate quickly if ignored. Acting fast — and drying thoroughly — can mean the difference between a quick repair and a full-scale renovation.
If your home has suffered ceiling damage from a leak, storm, or flood,Leak Proof Restorationcan help. Our team is fully licensed, insured, andIICRC-certified, specializing inwater damage restoration, mold remediation, and structural dryingfor homeowners across the Atlanta area.
We handle everything from leak detection to final paint touch-ups, so you can focus on getting your home — and peace of mind — back to normal.
Need Help Now?
📞Call Leak Proof Restoration 24/7
For emergency ceiling water damage restoration, mold removal, or plumbing repairs in Atlanta and surrounding areas.
💧Fast Response. Certified Technicians. Guaranteed Results.